
Driving Test Manoeuvres in Ireland — reverse, turnabout, hill start and parking
On the Irish car test the tester asks you to reverse around a corner, turn the car around on the road and start on a hill, and at the end you park. Here is exactly what the tester says, what they mark, and how to practise, taken from the RSA's own documents and the Rules of the Road.
In short
- What's on the test: a reverse around a corner, a turnabout and a hill start. Near the end the tester asks you to find a place and park.
- No parallel or bay parking on request. The tester just says "please find a suitable place and park". You may reverse park if you want to, but Park Assist is not allowed.
- The reverse: on a car test you reverse along the left-hand kerb, and carry on in a straight line for about three car lengths until the tester tells you to stop.
- The turnabout: "You may go over and back more than once if necessary." It doesn't have to be a three-point turn.
- What costs people the pass is observation. When you reverse on a car test, the RSA requires direct observation to the front, sides and rear, including blind spots, not just mirrors. Reversing cameras are fine only in addition to that.
- Don't refuse. If you won't attempt the reverse or the turnabout, the test is stopped and no result is issued.
Which Manoeuvres Are on the Irish Car Test
Three set pieces, plus parking at the end.
The RSA's guide Preparing for your driving test lists the practical part of the car test: technical checks, in-car checks, secondary controls, reversing around a corner, a turnabout manoeuvre and a hill start, all while you drive about eight kilometres in a variety of road and traffic conditions. The Rules of the Road says the test assesses, among other things, reversing, turnabout and parking (RotR p. 37).
| Manoeuvre | When it happens | What the tester marks |
|---|---|---|
| Reverse around a corner | On the route, into a side road the tester picks | Competence (control, position, progress), observation, right of way |
| Turnabout | On the route, on a road where you pull in | Competence, observation, right of way |
| Hill start | On the route, after you pull in on a hill | Securing the car on the handbrake, then moving off |
| Parking | Coming towards the end of the test | Competence, observation, legal position |
From the RSA's Driver Tester Marking Guidelines and the RSA's standard procedures for conducting driving tests.
Reverse Around a Corner
Into a side road on the left, along the kerb, slowly and looking all around.
What the tester says
What the marking guidelines say
- Left kerb. All Category B reverses, vans included, should be along the left-hand kerb. If you reverse along the right-hand kerb because you misunderstood, no fault is recorded.
- About three car lengths. Having reversed around the corner, you should continue in a straight line for approximately three car lengths, and the tester tells you when you've gone back far enough.
- Direct observation. On a car test, direct observations are required: to the front, sides and rear of the car, including the blind spots. Cameras and parking sensors are acceptable only in addition to that.
- Competence faults: hitting or mounting the kerb, going off course, inadequate progress, excessive speed, or not using the controls properly.
- Other road users: if you cause someone to slow down or stop, a fault is recorded for observation or right of way (not both for the same moment).
Good to know
- The tester will help adjust the left door mirror if you ask, and set it back afterwards (RSA standard procedures).
- Stopping close to the junction just before the reverse is not a fault (marking guidelines).
- The tester waits until the manoeuvre is finished before recording anything, and records only one fault per aspect, however many times it happens during the reverse (marking guidelines).
- Braking with your left foot while manoeuvring slowly is acceptable if it's done competently (marking guidelines).
- If the car ends up seriously out of position and you ask for another go, the tester will say "it won't be necessary" (marking guidelines).
How we teach it
This is our method, not RSA wording. Your instructor may adjust it to your car.
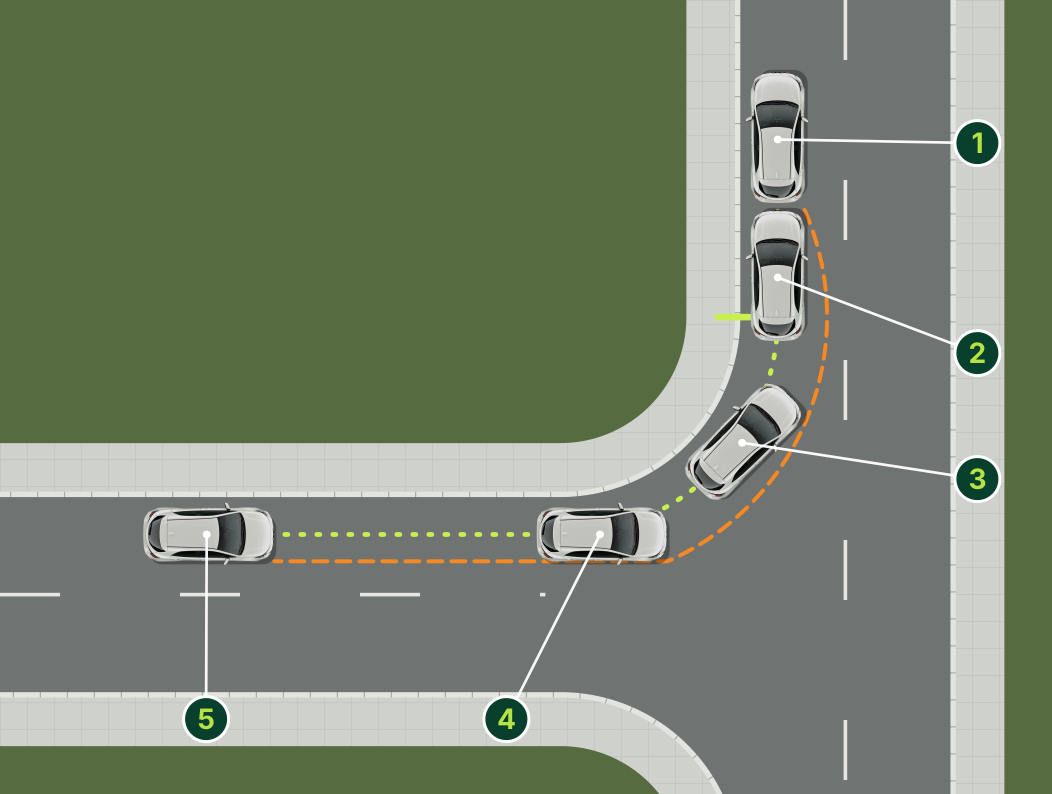
- 1Stopped on the left, past the side road, close to the kerb.
- 2The point of turn: the rear wheels are level with where the kerb starts to curve (the green mark on the kerb).
- 3Following the corner at the same distance from the kerb. The orange line is the front corner of the car, swinging out towards the middle of the main road.
- 4Straight in the side road, still close to the left kerb.
- 5About three car lengths back, where the tester will usually say you've gone far enough.
- Stop in the right place. Drive past the side road and pull in on the left, parallel to and reasonably close to the kerb, far enough past the corner that you can see into the side road behind you.
- Look before the wheels move. Make sure every window is clear first. Then check all around: both shoulders, out through the rear window, the mirrors and ahead. Move only after the look, every time the car starts to roll. Opening your window a little helps you hear traffic you can't yet see.
- Keep it slow. In a manual, the clutch at the biting point controls your speed. In an automatic, control it on the brake. Slow gives you time to react if someone appears.
- Hold your distance from the kerb. Reverse straight back until your rear wheel reaches the point where the kerb starts to curve, then steer to follow the corner, keeping the same distance from the kerb all the way round.
- Keep looking while you turn. Look mainly out through the rear window, but keep checking ahead and to the right too: as the car turns, the front swings out towards the middle of the road.
- Straighten up and keep going. As the car comes into line with the new road, straighten the wheel and continue straight back until the tester tells you to stop, about three car lengths.
- If anyone comes, stop. A pedestrian on the footpath, a car wanting to turn in or out, a cyclist: stop, let them go, look all around again, then carry on.
The Turnabout
Turn the car around on the road to face the other way, in as many moves as you need.
What the tester says
What the marking guidelines say
- Competence faults: hitting or bumping a kerb, inadequate progress, excessive speed, or not using the controls properly.
- Dry steering isn't a fault. No fault is recorded for turning the steering wheel while the car is stationary, although we still teach you to steer while the car moves (see below).
- Other road users: making someone slow down or stop is recorded as an observation or right-of-way fault.
- Cameras are acceptable only in addition to your own observation.
- As with the reverse, only one fault is recorded per aspect, and only once the manoeuvre is finished.
Picking the spot (RotR pp. 58–59)
- The Rules of the Road's advice on turning around applies here too. Look for a safe place where you can see clearly in all directions.
- Give way to all other road users, and check carefully for cyclists and motorcyclists.
- Don't delay or stop pedestrians crossing safely.
- Make sure there's enough room to complete the manoeuvre safely and smoothly.
How we teach it
This is our method, not RSA wording. Your instructor may adjust it to your car and the width of the road.
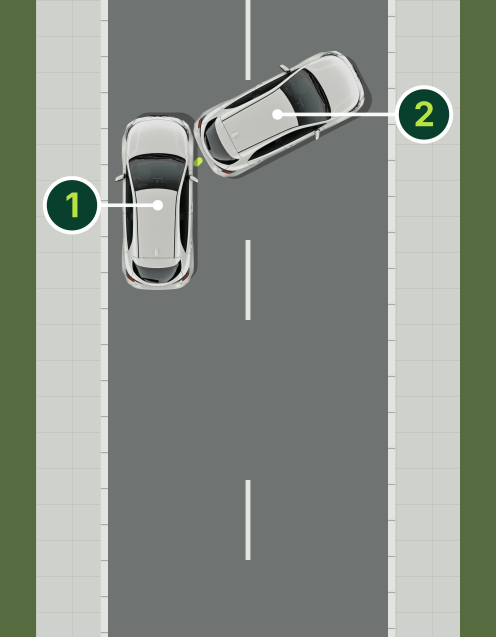
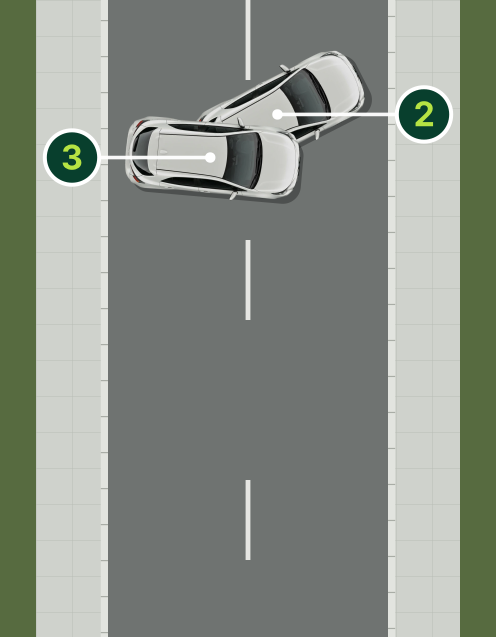
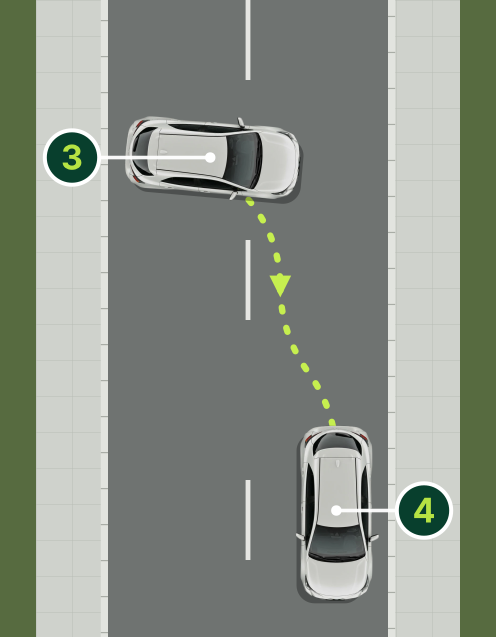
- 1Pulled in on the left. Move 1: forward across the road on full right lock, stopping short of the far kerb.
- 2Move 2: back across the road on full left lock, stopping short of the kerb behind you.
- 3Move 3: forward on right lock until the car faces the other way.
- 4Straighten up and move over to the left side of the road.
- Pull in somewhere sensible. Choose a straight stretch with a clear view both ways, away from driveways, parked cars and junctions. Away from the test, if you need to turn around, turning into a side road is usually the better and safer choice.
- Full look before every move. Before you go forward, and again before each reverse: mirrors, both blind spots, and both directions along the road. Take extra care in the dark (RotR p. 58).
- Slow wheels, quick hands. Keep the car at walking pace or slower with the clutch or the brake, and turn the wheel briskly while the car is moving. We teach you not to turn it while the car is stopped, even though the tester won't mark it.
- Mind the camber. Most roads slope down from the middle to the kerbs. Going forward you climb to the crown of the road and then roll down towards the far kerb, so be ready on the brake. Reversing away from a kerb is uphill, so you need a little more power. Use the handbrake whenever the car might roll.
- Turn the wheel the other way before you stop. As you get near the kerb, with the car still creeping, steer the opposite way, then stop just short of the kerb. The wheels are then already set for the next move.
- Back across, looking where you're going. When reversing, look mainly over your left shoulder and out through the rear window towards the kerb you're heading for, and keep checking both ways for traffic.
- Take another go if you need it. On a narrow road, go over and back again. Five calm, well-observed moves are better than three rushed ones.
- Finish on the left. Check all around again, move off and go over to the left side of the road, checking your mirror as you do.
- If traffic comes, wait. Stop and let it pass or let it decide what to do. Don't wave people through.
The Hill Start
Pull in on a hill, secure the car, then move off without rolling back.
- Secure the car. The marking guidelines say that on a hill start the vehicle must be secured with its parking brake or handbrake, manual or electronic, whichever is fitted. If you don't apply it properly, the tester asks you to secure the vehicle.
- Then move off as you would anywhere else: mirrors, blind spot, signal if it's needed, and away without rolling back or stalling.
How we teach it
Our method, not RSA wording.
- Stop, then secure. Handbrake on once the car has stopped, and cancel the signal you used to pull in.
- Prepare. First gear, a little more gas than on the flat, and bring the clutch up to the biting point. Only hold it there for a moment, not while you wait for a long gap: holding it is hard on the clutch.
- Look properly, not just in the mirrors. Mirrors, then over your right shoulder for traffic, and over your left shoulder at the footpath behind you for anyone about to step out.
- Go when the car is ready to climb. Release the handbrake as the car starts to pull, add a little more gas as the clutch comes up, keep looking as you move, and cancel the signal if it hasn't cancelled itself.
Practise more than the test hill: moving off uphill and downhill, from behind a parked car at an angle, and on the ramps of a multi-storey car park.
Parking at the End of the Test
No set manoeuvre, but it is still marked.
What the tester does
- Doesn't ask for a reverse parking manoeuvre, but won't stop you if you choose one.
- Stays in the car until it's parked, the handbrake is fully applied and the engine is off.
- May direct you to a parking space if needed.
- Park Assist is not permitted.
Parking faults in the marking guidelines
- Parking too far out from the kerb, or where you cause an obstruction.
- Parking illegally: on single or double yellow lines, on or partly on a footpath, or in a disabled bay.
- Parking without the required observations, or driving out of a space without them.
- Not applying the handbrake at the end of the test.
Five Myths About the Manoeuvres
What people believe, and what the RSA's documents actually say.
"It has to be a three-point turn."
No. The tester's own words are "You may go over and back more than once if necessary." Take as many moves as the road needs.
"They'll make me parallel park."
No. You're asked to "find a suitable place and park". Reverse parking isn't requested, though you may choose it.
"Mirrors are enough when reversing."
Not on a car test. Direct observation to the front, sides and rear, including blind spots, is required. A camera only counts as extra.
"Touch the kerb and you've failed."
Hitting or mounting the kerb is recorded as a competence fault. How serious it is depends on how it happened, and only one fault per aspect is recorded for the manoeuvre. A light touch is not automatically the end of the test, but avoid it.
"If I mess it up I can ask for another go."
If the car is seriously out of position and you ask to try again, the tester will say "it won't be necessary". Get it right slowly the first time.
"A pedestrian appeared, so I've failed."
No. Stopping, waiting and carrying on once it's clear is exactly what the tester wants to see. What gets marked is not noticing them, or making them wait for you.
How to Practise
Little and often, on quiet roads, with someone watching your observation.
The RSA's Learner Driver Training syllabus expects you to know the correct practice and to demonstrate correct positioning when reversing or doing a turnabout, and to understand the consequences of getting the position wrong. One of its sample questions for learners is simply: "Do you think that the reverse manoeuvre you carried out was done in a competent manner?" Your EDT sessions include performing the manoeuvres (parking, reversing and turnabout) in challenging situations.
- Practise where it's legal and considerate. Never reverse from a side road onto a main road. Take special care near schools, playgrounds, residential roads and car parks, where small children may be about (RotR p. 58).
- Ask your accompanying driver to watch your eyes, not the kerb. The question after every manoeuvre is: did you look all around before the car moved, and did you keep looking?
- Practise in different places. Sharp corners and gentle ones, narrow roads and wide ones, uphill and downhill. The test route won't use the corner you know best.
- Do a mock test. A mock test on real test routes shows you how the manoeuvres feel when someone is marking you.
Practise the manoeuvres on real test routes
Our pre-test lessons and mock tests cover the reverse, the turnabout and the hill start on the roads around your test centre, marked the way a tester marks them.
Driving lessons in Lucan · Tallaght · Clondalkin · Adamstown · Celbridge · Maynooth · Leixlip · all areas
Sources
- 📋 RSA, Preparing for your test, and the RSA booklet Preparing for your driving test (June 2024): what the car test includes, and the most common reasons learners are unsuccessful.
- 📋 RSA, Driver Tester Marking Guidelines ("Making your mark"): Reverse, Turnabout, Parking and Handbrake sections. Published by the RSA as "Fault marking guidelines for the driving test".
- 📋 RSA, Standard Procedures for Conducting Driving Tests (4 March 2026): turnabout, reverse, hill test and parking instructions, and refusal to attempt a manoeuvre.
- 📘 RSA, The Driving Instructor's Handbook, Appendix F, terms used by driver testers.
- 📘 RSA, Learner Driver Training Syllabus (Category B), section 2.6, and the RSA Essential Driver Training (EDT) Learner Driver Information Booklet.
- 📘 Rules of the Road, RSA, Revision No. 9, May 2026: p. 37 (what the test assesses), pp. 58–59 (reversing, U-turns), pp. 139–140 (parking), p. 149 (motorways), p. 222 (children), pp. 265 and 268 (Appendix 4, penalty points).
- ⚖️ S.I. No. 182/1997, Road Traffic (Traffic and Parking) Regulations 1997, article 12, Reversing (Law Reform Commission revised version, unchanged since 1997).